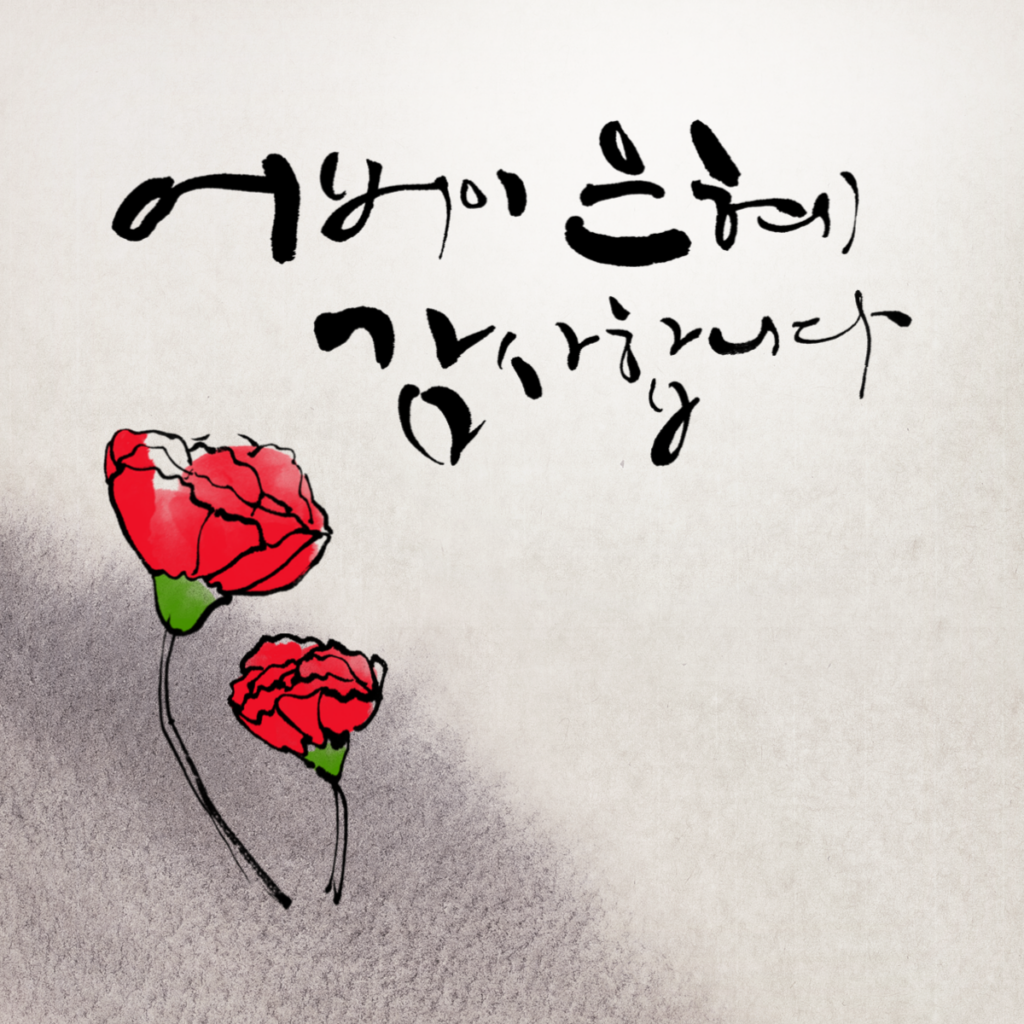
Handwritten Gratitude Matters More Than Ever
How to write acknowledgement in calligraphy well over 80% of couples in South Korea and the U.S. still choose physical wedding invitations or cards alongside their digital RSVPs. Why? Because there’s something timeless about a handwritten card that technology simply cannot replace. And at the heart of this tradition lies the question of how to write acknowledgement in calligraphy not just as decoration, but as an intentional expression of gratitude.
Imagine handing a guest a card that doesn’t just say “thank you” in plain print, but does so with swirls of ink, elegant strokes, and personality infused into every curve of a letter. That’s the magic of calligraphy. Today, we’re going to unpack everything you need to know about how to write acknowledgement in calligraphy for your wedding cards, why it matters, how to do it step-by-step, and even how it compares to other creative processes.
Glossary
Before diving in, let’s decode the vocabulary. When learning how to write acknowledgement in calligraphy, these terms will pop up often, and it’s easier to move forward when you know exactly what they mean.
- Calligraphy – The art of decorative handwriting. Each stroke is purposeful, from thin upstrokes to thick downstrokes.
- Acknowledgement – A formal or informal thank-you note, often written for wedding guests, vendors, or family.
- Ink Flow – How smoothly your pen delivers ink onto the paper. Essential for keeping your acknowledgements neat.
- Nibs – The small metal tips of calligraphy pens that determine line thickness.
- Flourishes – The extra swirls and curls added to letters for flair.
- Baseline – The invisible line your text “sits” on, ensuring consistency.
- Kerning – Adjusting the space between letters for readability.
- Italic Hand – A style of calligraphy with elegant slants, perfect for acknowledgements.
- Copperplate Script – A classic calligraphy style known for its romantic feel, often used in wedding stationery.
- Brush Pen – A modern calligraphy tool, perfect for beginners learning how to write acknowledgement in calligraphy.
- Watercolor Wash – A decorative background applied before writing in calligraphy.
- Gold Foil Accent – A shiny embellishment that highlights acknowledgements.
- Hierarchy – Designing acknowledgements so the recipient’s name stands out.
- Alignment – Centered or left-justified layouts in calligraphy cards.
- Acknowledgement Etiquette – The tradition of thanking guests formally in written form, especially during weddings.
Knowing this vocabulary equips you to confidently understand tutorials, suppliers, and even online communities as you practice.
Why Writing in Calligraphy Makes a Difference
You might ask, “Why not just type acknowledgements on a printer?” The reason is simple: Calligraphy shows care. When couples learn how to write acknowledgement in calligraphy, they’re choosing personalization over mass production.
Think about which feels more meaningful: receiving a generic “thank you for coming” card, or one where every stroke feels intentional and beautiful? The latter tells your guest: you were worth the effort.
The Bigger Picture: Acknowledgement Cards in Context
Acknowledgement cards are more than stationery; they’re emotional tokens. Just as a tea business plan lays out strategies for sustainability and growth in a café, learning how to write acknowledgement in calligraphy creates a sustainable memory. Guests don’t throw these cards away lightly; many frame them, tuck them into books, or share them online.
Example 1: Protecting Relationships Through Handwritten Thanks
Let’s say a guest traveled hours to attend your wedding. A digital thank-you email could feel transactional. But a card handwritten in calligraphy? That builds loyalty, warmth, and lasting relationships.
Example 2: Buying Time Without Losing Touch
Sometimes, weddings leave couples financially stretched. Postponing expensive gestures is common, but acknowledgements don’t have to wait. How to write acknowledgement in calligraphy ensures you can give immediate thanks, even if bigger gifts (like photos or albums) come later.
Step-by-Step: How to Write Acknowledgement in Calligraphy for Weddings
- Gather Tools: Pen (nib or brush), quality paper, ink, and a ruler.
- Plan the Layout: Draft the acknowledgement text. Keep it short but heartfelt.
- Choose a Style: Italics for elegance, Copperplate for romance, Brush Pen for casual vibes.
- Lightly Pencil Guidelines: Draw baselines and margins to keep writing even.
- Write Slowly: Thin up, thick down. Focus on consistency.
- Add Flourishes: Gentle swirls for names or at the card edges.
- Decorate: Add watercolor or gold foil touches.
- Dry and Review: Let ink settle, erase pencil lines, check spacing.
- Finalize: Sign your name or initials for personal branding.
By following these steps, you’ve not only learned how to write acknowledgement in calligraphy, but also elevated your guest’s experience.
A Realistic “Buy-Time” Timeline for Acknowledgement Cards
Here’s how couples often schedule their calligraphy acknowledgements:
- Day 0 (Wedding Ends): Draft acknowledgement text.
- Week 1–2: Practice styles, decide on final calligraphy layout.
- Week 3–4: Write 10–15 cards a day.
- Week 5–6: Finish all cards, review for errors, add decorative touches.
- Week 7: Send them out.
This ensures your acknowledgements are timely without overwhelming you.
What Each Style Option Looks Like
- Copperplate: Flowing, elegant, ideal for formal weddings.
- Italic Hand: Clean, angled, perfect balance of formality and readability.
- Brush Pen: Bold, expressive, adds a modern twist.
- Modern Freehand: Whimsical, creative, fun for casual weddings.
Each option gives a different personality, so couples can choose based on their theme.
Protecting Guests’ Experience: Why It Matters
How to write acknowledgement in calligraphy isn’t just about aesthetics — it’s about safeguarding emotions. Your guests invested time, money, and energy to be there. When they receive a handwritten acknowledgement, they feel included, remembered, and appreciated.
Much like structured confluence templates help teams stay organized in workplaces, calligraphy acknowledgements provide structure to your gratitude, keeping it professional yet heartfelt.
FAQs
Q1. Do I need professional calligraphy training?
Not necessarily. With practice, even beginners can create beautiful acknowledgements.
Q2. How many acknowledgements should I write daily?
Aim for 10–15 to avoid hand fatigue and keep quality consistent.
Q3. What if I make a mistake?
Keep correction tools handy: white ink for small fixes or start fresh for big errors.
Q4. Can I mix calligraphy with printed fonts?
Absolutely. Many couples combine printed text with handwritten names or key phrases.
Q5. How do I preserve cards?
Use acid-free paper and store samples in protective sleeves.
The Bottom Line
At the end of the day, how to write acknowledgement in calligraphy isn’t just about ink on paper. It’s about love translated into handwriting, gratitude embodied in strokes, and memories captured in cards that guests will treasure.
Whether you choose Copperplate’s elegance, Italic’s grace, or Brush Pen’s boldness, the act itself is the reward. It shows thoughtfulness, creativity, and connection.
So, if you’ve been wondering where to start, pick up that pen tonight. Start practicing. Your guests will thank you not just with smiles, but with memories they’ll hold on to long after your wedding day.

I’m Ethan Richards, the guy running the show at “Acknowledgment Templates.” I’ve been playing with expressions and formats to make acknowledgment writing a whole lot of fun. Over at Acknowledgment Templates, we’re here to make your acknowledgment section incredible. Let’s add some professionalism and gratitude to your project together!